ナビメッシュエージェントの目的地のためのVector3の配列を作って、カスタムエディタでその各要素をシーンビューに表示してみました。
配列を宣言
まず、空のゲームオブジェクトにスクリプトをつけて、Vector3の配列を宣言しインスペクタで変更できるようにします。
using UnityEngine;

public class WaypointsTest : MonoBehaviour
{
    // 地点の配列
    [SerializeField] Vector3[] waypoints = new Vector3[0];


    // Start is called before the first frame update
    void Start()
    {

    }

    // 配列の要素をランダムに取得
    public Vector3 GetRandomPoint()
    {
        return waypoints[Random.Range(0, waypoints.Length)];
    }

}
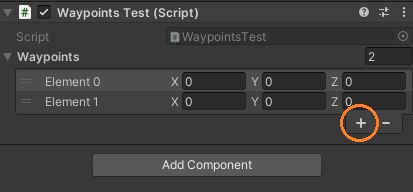
これでインスペクタのスクリプトコンポーネントで、+ボタンから配列に要素を追加したり、値を入力することができます。
さらに、直感的に値を変更できるように、シーンビューで各要素の座標にハンドルを表示してみます。
カスタムエディタを作る
EditorフォルダにC#スクリプトを作ります。
using UnityEngine;
using UnityEditor;

[CustomEditor(typeof(WaypointsTest))]
public class WaypointsTestEditor : Editor
{
    SerializedProperty waypoints;

    private void OnEnable()
    {
        // SerializedPropertyを取得
        waypoints = serializedObject.FindProperty("waypoints");
    }


    private void OnSceneGUI()
    {
        serializedObject.Update();

        // 配列を一巡
        for (int i = 0; i < waypoints.arraySize; i++)
        {
            // GUI要素を囲う
            EditorGUI.BeginChangeCheck();

            // ハンドルを表示
            Vector3 pos = Handles.PositionHandle(waypoints.GetArrayElementAtIndex(i).vector3Value, Quaternion.identity);

            // 囲われたGUI要素に変更があればtrue
            if (EditorGUI.EndChangeCheck())
            {
                Undo.RecordObject(target, "Move point");

                // SerializedPropertyに値を設定
                waypoints.GetArrayElementAtIndex(i).vector3Value = pos;
            }
        }

        // 変更したプロパティを適用
        serializedObject.ApplyModifiedProperties();
    }
}
このスクリプトでは、クラスにCustomEditor属性を付けて、Editorクラスを継承させます。CustomEditor属性の引数には、カスタマイズするクラスを渡します。
[CustomEditor(typeof(WaypointsTest))]
public class WaypointsTestEditor : Editor
また、そのクラスのプロパティ名からSerializedPropertyを取得します。
SerializedProperty waypoints;

private void OnEnable()
{
    // SerializedPropertyを取得
    waypoints = serializedObject.FindProperty("waypoints");
}
そして、シーンビューにハンドルを表示するために、OnSceneGUIメソッドを実装します。
private void OnSceneGUI()
{
    serializedObject.Update();

    // 配列を一巡
    for (int i = 0; i < waypoints.arraySize; i++)
    {
        // GUI要素を囲う
        EditorGUI.BeginChangeCheck();

        // ハンドルを表示
        Vector3 pos = Handles.PositionHandle(waypoints.GetArrayElementAtIndex(i).vector3Value, Quaternion.identity);

        // 囲われたGUI要素に変更があればtrue
        if (EditorGUI.EndChangeCheck())
        {
            Undo.RecordObject(target, "Move point");

            // SerializedPropertyに値を設定
            waypoints.GetArrayElementAtIndex(i).vector3Value = pos;
        }
    }

    // 変更したプロパティを適用
    serializedObject.ApplyModifiedProperties();
}
参考:https://docs.unity3d.com/2020.1/Documentation/Manual/editor-CustomEditors.html
ここでは、SerializedPropertyの各要素の値が示す座標にハンドルを表示します。EditorGUI.BeginChangeCheckメソッドとEditorGUI.EndChangeCheckメソッドでハンドルを囲うと、ハンドルに変更があったときにEditorGUI.EndChangeCheckメソッドがtrueを返すので、SerializedPropertyの値を変更します。
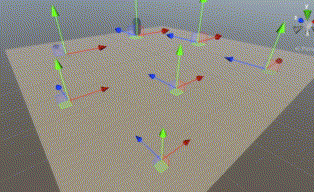
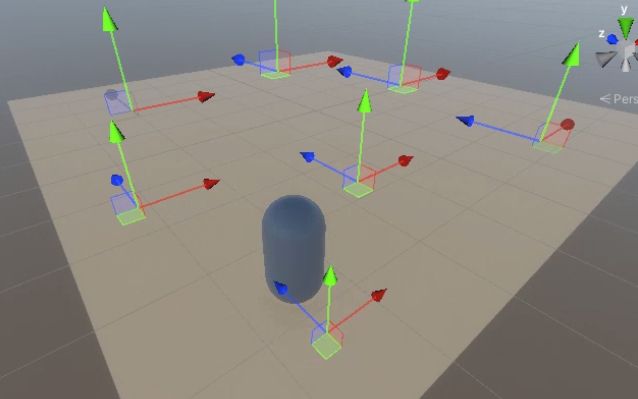
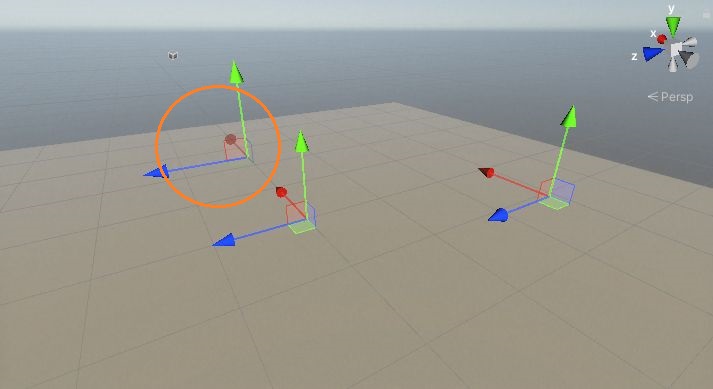
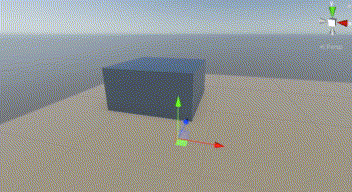
これでシーンビューにハンドルが出現しました。

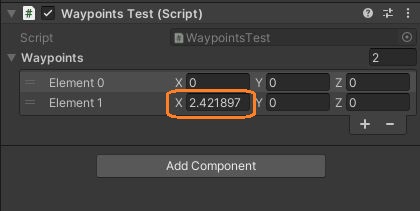
ハンドルを動かすと、インスペクタの値も変わります。
ハンドルは、CtrlキーとShiftキーを押しながら中心をドラッグすると、コライダーの表面にスナップさせることができます。
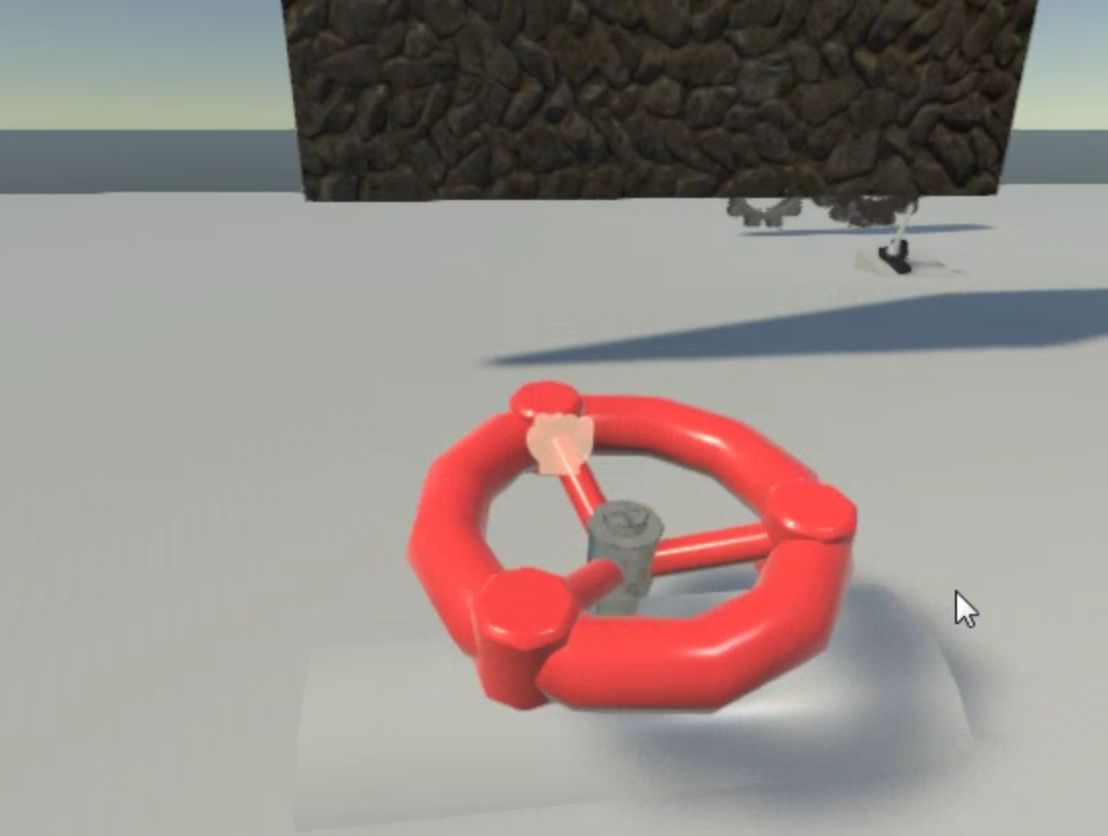
ナビメッシュエージェントの目的値に設定
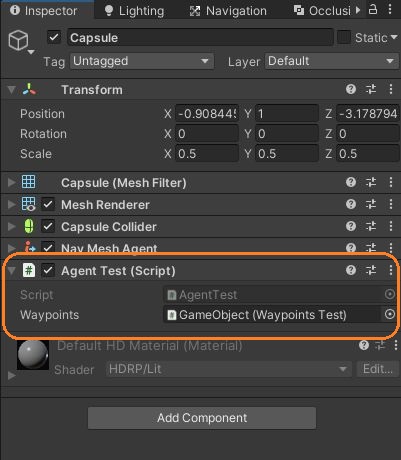
Capsuleオブジェクトにナビメッシュエージェントコンポーネントとスクリプトをつけて徘徊させます。目的地の座標は、はじめのスクリプトから取得しました。
using UnityEngine;
using UnityEngine.AI;

[RequireComponent(typeof(NavMeshAgent))]
public class AgentTest : MonoBehaviour
{
    [SerializeField] WaypointsTest waypoints;
    NavMeshAgent agent;

    private void Awake()
    {
        agent = GetComponent<NavMeshAgent>();
    }

    // Start is called before the first frame update
    void Start()
    {
        GotoNextPoint();
    }

    // Update is called once per frame
    void Update()
    {
        // 目的地に付いたら
        if (!agent.pathPending && agent.remainingDistance < 0.2f)
        {
            GotoNextPoint();
        }
    }

    // 次の目的地を設定
    void GotoNextPoint()
    {
        agent.destination = waypoints.GetRandomPoint();
    }
}
これでナビメッシュエージェントの目的地の位置をシーンビューで変更できるようになりました。