ChatGPTを使って、新しくマテリアルを作成して、複数選択したすべてのオブジェクトに割り当てるスクリプトを作りました。
マテリアルを作るときは、新規テクスチャが設定されたImage TextureノードやNormal mapノードを追加し自動で接続します。
今回は、すべてのオブジェクトに一つのマテリアルしか割り当てられていない状態にします。また、同じ名前のマテリアルがあれば新規作成せずにそれを使います。
スクリプト
import bpy


def initialize_material_nodes_and_textures(material):

    material_name = material.name

    # マテリアルのノードを作成
    material.use_nodes = True
    material.node_tree.nodes.clear()

    nodes = material.node_tree.nodes
    links = material.node_tree.links


    # デフォルトのマテリアルアウトプットノード
    material_output = nodes.new('ShaderNodeOutputMaterial')
    material_output.location = (300, 25)

    # Principled BSDFノード
    principled_bsdf = nodes.new('ShaderNodeBsdfPrincipled')
    principled_bsdf.location = (0, 0)
    links.new(principled_bsdf.outputs['BSDF'], material_output.inputs['Surface'])

    # Normal Mapノード
    normal_map = nodes.new('ShaderNodeNormalMap')
    normal_map.location = (-250, -730)
    links.new(normal_map.outputs['Normal'], principled_bsdf.inputs['Normal'])


    map_size = bpy.context.scene["my_enum_prop"]

    # Image Textureノード(Albedo)
    image_albedo = nodes.new('ShaderNodeTexImage')
    image_albedo.location = (-400, 100)
    image_albedo.image = bpy.data.images.new(name=material_name + '_albedo', width=map_size, height=map_size)
    image_albedo.image.colorspace_settings.name = 'sRGB'
    image_albedo.image.use_fake_user = True
    links.new(image_albedo.outputs['Color'], principled_bsdf.inputs['Base Color'])

    # Image Textureノード(Metallic)
    image_metallic = nodes.new('ShaderNodeTexImage')
    image_metallic.location = (-400, -170)
    image_metallic.image = bpy.data.images.new(name=material_name + '_metallic', width=map_size, height=map_size)
    image_metallic.image.colorspace_settings.name = 'Non-Color'
    image_metallic.image.use_fake_user = True
    links.new(image_metallic.outputs['Color'], principled_bsdf.inputs['Metallic'])

    # Image Textureノード(Roughness)
    image_roughness = nodes.new('ShaderNodeTexImage')
    image_roughness.location = (-400, -440)
    image_roughness.image = bpy.data.images.new(name=material_name + '_roughness', width=map_size, height=map_size)
    image_roughness.image.colorspace_settings.name = 'Non-Color'
    image_roughness.image.use_fake_user = True
    links.new(image_roughness.outputs['Color'], principled_bsdf.inputs['Roughness'])

    # Image Textureノード(Normal)
    image_normal = nodes.new('ShaderNodeTexImage')
    image_normal.location = (-600, -760)
    image_normal.image = bpy.data.images.new(name=material_name + '_normal', width=map_size, height=map_size)
    image_normal.image.colorspace_settings.name = 'Non-Color'
    image_normal.image.use_fake_user = True
    links.new(image_normal.outputs['Color'], normal_map.inputs['Color'])

    for n in nodes:
        n.select = False


def create_material():
    # 現在のシーンとテキストフィールドの値を取得
    scene = bpy.context.scene

    material_name = scene.my_string_prop

    # オブジェクトが選択されているか確認
    selected_objects = bpy.context.selected_objects
    if not selected_objects:
        raise Exception("No objects selected.")

    # マテリアルを作成
    material = bpy.data.materials.get(material_name)

    if material is None :
        material = bpy.data.materials.new(name=material_name)
        initialize_material_nodes_and_textures(material)

    material.use_fake_user = True

    # 選択された全てのオブジェクトをループ
    for obj in bpy.context.selected_objects:
        # オブジェクトをアクティブに設定
        bpy.context.view_layer.objects.active = obj

        # マテリアルがある場合のみ処理を行う
        if obj.type == 'MESH' and obj.material_slots:
            # 全てのマテリアルのuse_fake_userをTrueに設定
            for slot in obj.material_slots:
                if slot.material is not None:  # マテリアルスロットが空でないことを確認
                    slot.material.use_fake_user = True
            # 全てのマテリアルスロットを削除
            for _ in range(len(obj.material_slots)):
                bpy.ops.object.material_slot_remove()

    # マテリアルを選択されたオブジェクトに割り当て
    for obj in selected_objects:
        if obj.type == 'MESH':
            obj.data.materials.append(material)


create_material()
まず、シェーダーノードやテクスチャを設定するメソッドを定義しています。ノードツリーからすべてのノードを削除して、マテリアルアウトプットノードやPrincipled BSDFノード、Normal Mapノードを作成しています。
def initialize_material_nodes_and_textures(material):

    material_name = material.name

    # マテリアルのノードを作成
    material.use_nodes = True
    material.node_tree.nodes.clear()

    nodes = material.node_tree.nodes
    links = material.node_tree.links


    # デフォルトのマテリアルアウトプットノード
    material_output = nodes.new('ShaderNodeOutputMaterial')
    material_output.location = (300, 25)

    # Principled BSDFノード
    principled_bsdf = nodes.new('ShaderNodeBsdfPrincipled')
    principled_bsdf.location = (0, 0)
    links.new(principled_bsdf.outputs['BSDF'], material_output.inputs['Surface'])

    # Normal Mapノード
    normal_map = nodes.new('ShaderNodeNormalMap')
    normal_map.location = (-250, -730)
    links.new(normal_map.outputs['Normal'], principled_bsdf.inputs['Normal'])
すべてのノードを削除するには、Nodes.clearメソッドを使います。
material.node_tree.nodes.clear()ノードを追加するには、Nodes.newメソッドの引数に、追加するノードのタイプの文字列を渡します。
material_output = nodes.new('ShaderNodeOutputMaterial')ノードの位置を設定するには、Node.locationに座標を代入します。
material_output.location = (300, 25)ノード同士を接続するには、NodeLinks.newメソッドの第一引数に出力ソケット、第二引数に入力ソケットを渡します。
inks.new(principled_bsdf.outputs['BSDF'], material_output.inputs['Surface'])ノードのoutputs、inputs変数でそのノード出力、入力ソケットのコレクションが得られます。
参考:https://docs.blender.org/api/current/bpy.types.Nodes.html#nodes-bpy-structhttps://docs.blender.org/api/current/bpy.types.Node.html
https://docs.blender.org/api/current/bpy.types.NodeLinks.html
Image Textureノードを追加
Image Textureノードも同様に追加します。テクスチャを作成するときに指定するサイズは、カスタムパネルに入力した値を他のスクリプトで使うで作った列挙体の定義を変更して、その値を使っています。
def register():
    bpy.utils.register_class(SimplePanel)
    bpy.types.Scene.my_string_prop = bpy.props.StringProperty(name="Name")
    bpy.types.Scene.my_enum_prop = bpy.props.EnumProperty(name="Map Size",
                                                          items=[("1K", "1024px", "", 1024),
                                                                 ("2K", "2048px", "", 2048),
                                                                 ("3K", "4096px", "", 4096)],
                                                                 default="2K")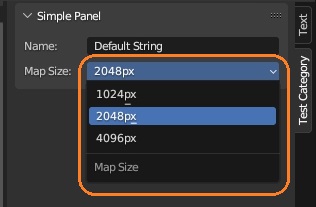
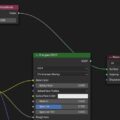
カスタムパネルのドロップダウンで選択した値は、他のスクリプトで簡単に取得できます。
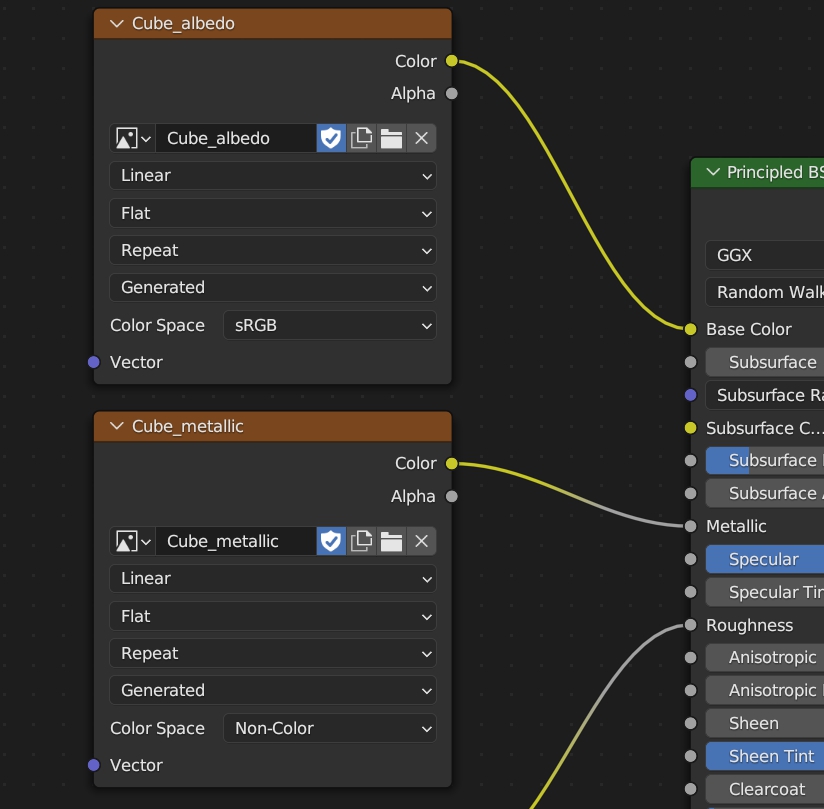
map_size = bpy.context.scene["my_enum_prop"]bpy.data.images.newメソッドで新規テクスチャを作成できます。今回は、マテリアルの名前に「_albedo」や「_metallic」などの接尾辞をつけた名前のテクスチャを作っています。引数にテクスチャの名前やwidth、heightを渡します。
image_albedo.image = bpy.data.images.new(name=material_name + '_albedo', width=map_size, height=map_size)ShaderNodeTexImageオブジェクトのimageに新規テクスチャを代入したら、色空間の設定をして、Fake UserをTrueにし、他のノードと接続しています。
    image_albedo.image.colorspace_settings.name = 'sRGB'
    image_albedo.image.use_fake_user = True
links.new(image_albedo.outputs['Color'], principled_bsdf.inputs['Base Color'])https://docs.blender.org/api/current/bpy.types.Image.html
これらの処理を繰り返し合計4つのImage Textureノードを作ります。
# Image Textureノード(Metallic)
image_metallic = nodes.new('ShaderNodeTexImage')
image_metallic.location = (-400, -170)
image_metallic.image = bpy.data.images.new(name=material_name + '_metallic', width=map_size, height=map_size)
image_metallic.image.colorspace_settings.name = 'Non-Color'
image_metallic.image.use_fake_user = True
links.new(image_metallic.outputs['Color'], principled_bsdf.inputs['Metallic'])
# Image Textureノード(Roughness)
image_roughness = nodes.new('ShaderNodeTexImage')
image_roughness.location = (-400, -440)
image_roughness.image = bpy.data.images.new(name=material_name + '_roughness', width=map_size, height=map_size)
image_roughness.image.colorspace_settings.name = 'Non-Color'
image_roughness.image.use_fake_user = True
links.new(image_roughness.outputs['Color'], principled_bsdf.inputs['Roughness'])
# Image Textureノード(Normal)
image_normal = nodes.new('ShaderNodeTexImage')
image_normal.location = (-600, -760)
image_normal.image = bpy.data.images.new(name=material_name + '_normal', width=map_size, height=map_size)
image_normal.image.colorspace_settings.name = 'Non-Color'
image_normal.image.use_fake_user = True
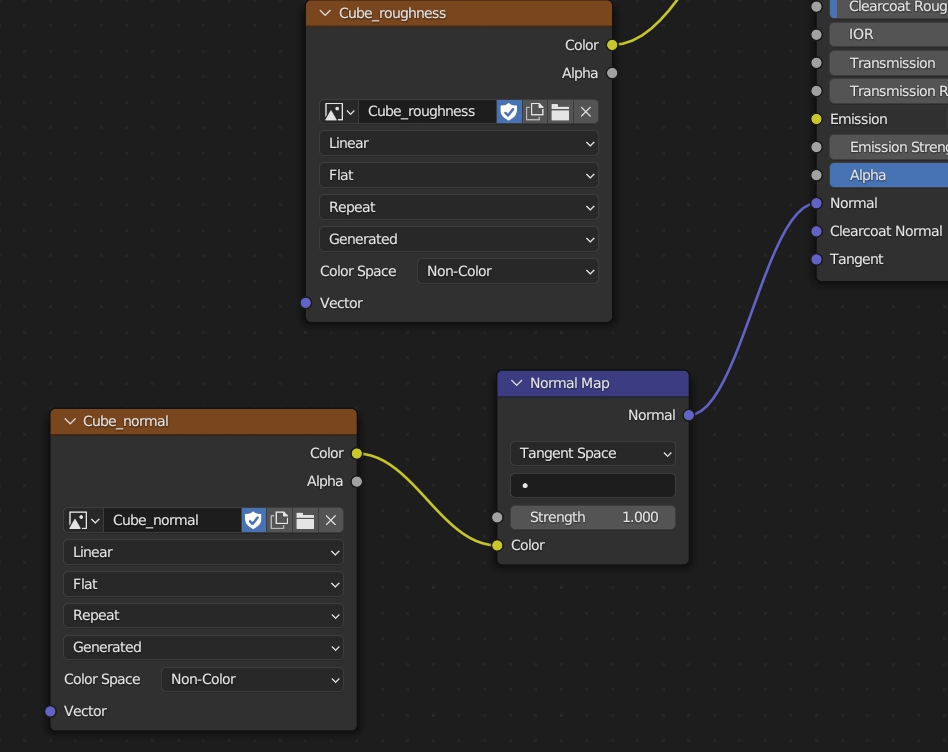
links.new(image_normal.outputs['Color'], normal_map.inputs['Color'])Principled BSDFノードのBase Colorに接続するノード以外は、色空間を「Non-Color」に設定しています。ノーマルマップ用のノードはNormal Mapノードに接続しています。
すべてのノードが選択されて状態になるので、最後にすべてのノードの選択をオフにしています。
    for n in nodes:
        n.select = False
マテリアルスロットの設定
次に選択したオブジェクトのマテリアルスロットを削除して、新規マテリアルを追加するメソッドを定義しています。
まず、マテリアルの名前として使うために、前の記事のカスタムパネルのテキストフィールドの入力値を取得します。
def create_material():
    # 現在のシーンとテキストフィールドの値を取得
    scene = bpy.context.scene

    material_name = scene.my_string_prop

    # オブジェクトが選択されているか確認
    selected_objects = bpy.context.selected_objects
    if not selected_objects:
        raise Exception("No objects selected.")
オブジェクトが選択されていない場合、Infoエディタにエラーを表示します。
bpy.data.materials.getメソッドの引数にマテリアルの名前を渡すと、同じ名前のマテリアルが返ります。なければ、bpy.data.materials.newメソッドでマテリアル名を指定して新規作成し、はじめに定義したシェーダーノードを設定するメソッドを呼びます。
    # マテリアルを作成
    material = bpy.data.materials.get(material_name)

    if material is None :
        material = bpy.data.materials.new(name=material_name)
        initialize_material_nodes_and_textures(material)

material.use_fake_user = Truehttps://docs.blender.org/api/current/bpy.types.BlendDataMaterials.html#bpy.types.BlendDataMaterials
そして、選択したすべてのオブジェクトのすべてのマテリアルのマテリアルスロットを削除します。スロットを削除する前にマテリアルのFake UserをTrueにしています。
    # 選択された全てのオブジェクトをループ
    for obj in bpy.context.selected_objects:
        # オブジェクトをアクティブに設定
        bpy.context.view_layer.objects.active = obj

        # マテリアルがある場合のみ処理を行う
        if obj.type == 'MESH' and obj.material_slots:
            # 全てのマテリアルのuse_fake_userをTrueに設定
            for slot in obj.material_slots:
                if slot.material is not None:  # マテリアルスロットが空でないことを確認
                    slot.material.use_fake_user = True
            # 全てのマテリアルスロットを削除
            for _ in range(len(obj.material_slots)):
                bpy.ops.object.material_slot_remove()
bpy.ops.object.material_slot_removeメソッドで選択中のマテリアルスロットが削除されます。
最後に、選択中のすべてのオブジェクトに新規に取得したマテリアルを割り当てています。
    # マテリアルを選択されたオブジェクトに割り当て
    for obj in selected_objects:
        if obj.type == 'MESH':
            obj.data.materials.append(material)
テキストエディタで再生ボタンを押すと、最後の行でマテリアルを作成するメソッドが呼ばれます。
create_material()スクリプトを実行
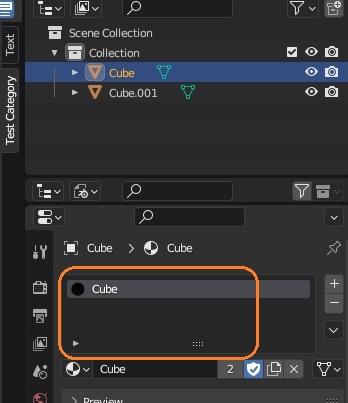
シーンに2つのCubeを追加して、それぞれマテリアルを割り当てました。
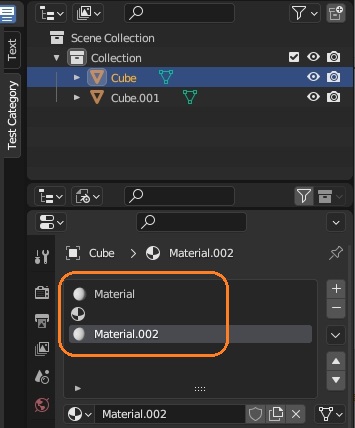
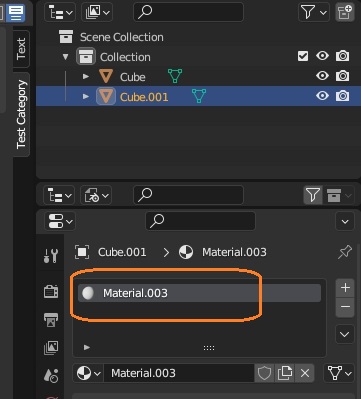
スロットが複数の場合もあり、空のスロットもあります。
ScriptingワークスペースでテキストエディタのNewボタンを押し、上のスクリプトをコピペします。

カスタムパネルのテキストフィールドに名前を入力し、オブジェクトを複数選択して、再生ボタンを押します。
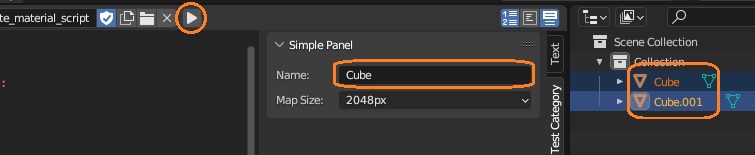
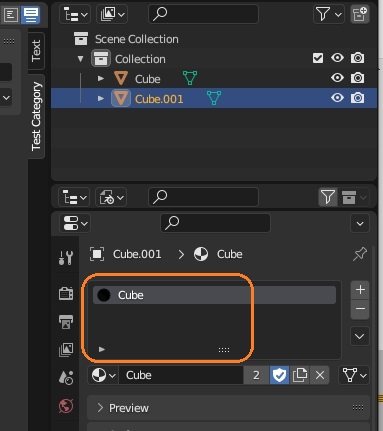
すると、両方のオブジェクトに同じマテリアルが一つだけ設定されている状態になりました。
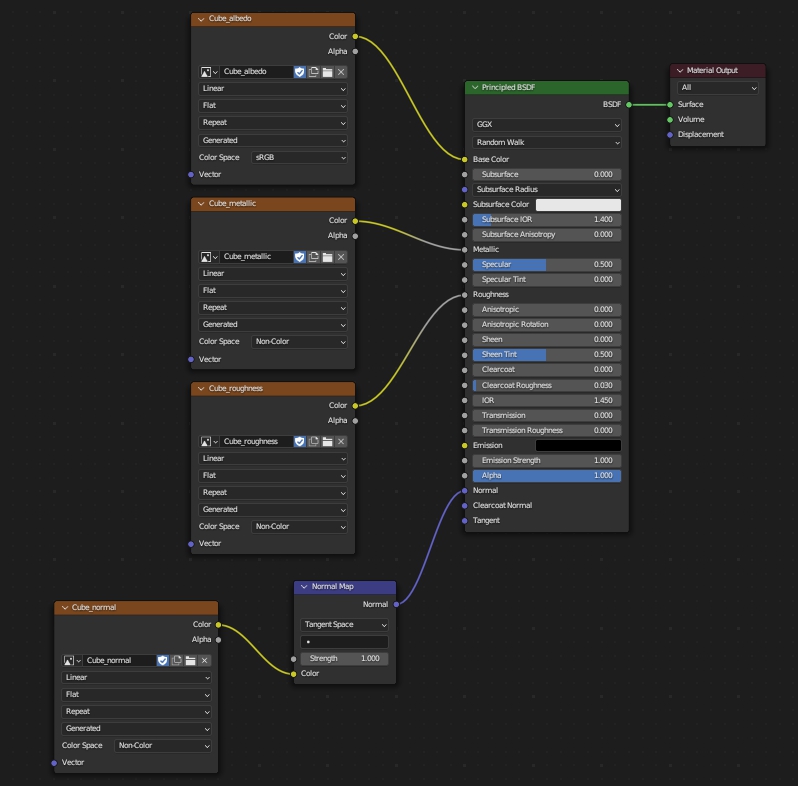
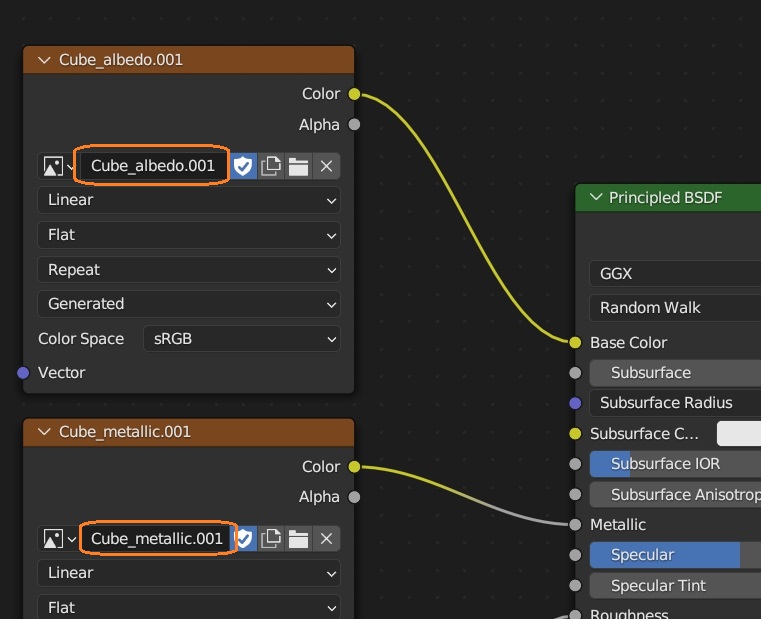
Shaderエディタを見るとノードが正しく設定されています。

これで、新規マテリアルのノードを設定して、選択したオブジェクトに割り当てることができました。
ChatGPT
今回も、ChatGPT(GPT-4)にスクリプトを書いてもらい、何度か書き直しました。マテリアルスロットをすべて削除する部分は、空のスロットが残ってしまったりしたので、個別に作ってもらい元のコードと入れ替えました。
また、同じ名前で再度スクリプトを走らせたときに、別名のテクスチャが作成されてしまいました。
なので、シェーダーノードを設定する部分だけを別のメソッドにコピペして、同じ名前のマテリアルがあるときはその処理をスキップするように修正しました。すべてのノードの選択を解除する部分も自分で加えています。